Not had much time lately to spend on my project machine or this blog.
And then on Sunday night, the first reasonably chilly night of the year, my boiler packed up.
In fact, to be more precise, there was no spark at the electrodes over the gas burner and so the damn thing would not light. Now, being the inquisitive sort, I couldn't help having a poke around. I quickly identified that tapping underneath the tray containing the PCBs whilst the boiler was going through its lighting cycle resulted in a spark and flame and a lit boiler. On the other hand, this was the only way to get the boiler to light, whether for hot water or heating. Needless to say, the house was freezing cold this morning when I woke up.
On inspection through the window into the combustion chamber, the electrodes do look like they're past their best: the gap between them is, according to the manufacturer, supposed to be 4mm. The ends of the electrodes look burnt away and the gap looks at least 6mm so I've ordered a new pair today.
That doesn't explain why the boiler wasn't even trying to light, however. So, bearing in mind my technique for getting it to light (see above), I decided there might be a fault on the ignition PCB.
A bit of googling later and it turns out that this particular PCB is known to have problems. The PCB is made by Honeywell (GC E83-142) and is used in a number of boilers made by different manufacturers (for example Ideal (part no. 172548) or Biasi (part no. BI1305101), same part but different price!). Perhaps more interestingly was the number of firms offering 'repaired' PCBs on an exchange basis for about half the price of a new board.
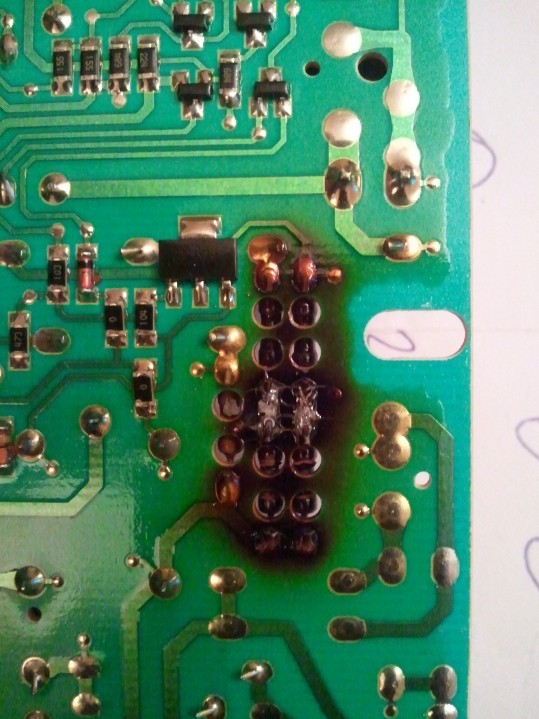
Tonight I removed the PCB. The photos below show heat damage on the board around the 16KO and 10KO resistors. In fact, the heat seems to have dissolved the original solder away and the resistors were 'rocking' on the board. This probably explains why the boiler did start when I gave the underside of the PCB tray a knock - it was enough to shake those poor resistors into action!
So, I popped out my trusty soldering iron and after cleaning off the old, burnt varnish, applied some fresh solder at the relevant points. A quick visual check over the rest of the PCB didn't reveal any other obvious problems so I refitted the board and switched the boiler on. That was a couple of hours ago and the boiler has been fine since. Toasty.
Tomorrow I think I'll get some replacement resistors and do a proper repair job. This will complement the new electrodes (the Ideal part numbers for which are, incidentally, 172532 and 172533 (GC E83-126 and E83-127)).
More soon, no doubt...